How to Fix Videos that Cannot be Played Due to Transfer?
Most of the time, we encounter video play errors when transferring videos from one device to another device. However, we can fix video play errors with or without third-party applications.
The video fails to play because of the incomplete transfer from one device to another; it may infected with the viruses and malware present within the system. However, it is not difficult to fix these types of issues.
In this article, I’ll explain the different methods that you can use to fix the video that has been corrupted after the transfer. Before that, I’ll address some essential reasons that can cause damage while transferring the videos.
Why Doesn’t the Video Play After the Transfer?
Once you transfer the video from one device to another or from one folder to another, the video may get corrupted for one of the following reasons.
- The device or system where you transferring the video is corrupt or faulty. For example, the corrupt memory card or USB flash drive always fails to play the video.
- When you transfer video files to a new device or system running on low storage, video files get corrupted.
- The video files may get corrupted when you transfer large-size videos simultaneously from one device to another.
- The video gets damaged or corrupted while the video transfer or download interrupts. The incomplete transfer and download lead to a corrupted video file that can not be played.
- The video might get corrupted while it is infected with viruses and malware present in the device.
- The video files get interrupted when the video is transferred to a device that is incorrectly injected into the device. For example, a USB or mobile device can be connected to a system.
X Ways to Fix Video Files that Can Not be Played Due to Transfer
Follow these methods to fix the transferred video files that can not be played after the transfer.
Method 1: Fix Corrupted Video Files Using the iBekit AI Universal Video Repairer
The AI Universal Video Repair program by iBekit is good enough to fix every type of corrupted video file within a few seconds. It uses its AI technology to repair the damaged video directly, using all the aspects from the reference video.

Follow these steps to fix the corrupted video due to transfer using the iBekit toolkit.
- Download the “AI Universal Video Repair” software on your PC, which is available for Windows and Mac computers.
- To install the software, double-click on the downloaded software file and then follow the on-screen instructions to complete the installation process.
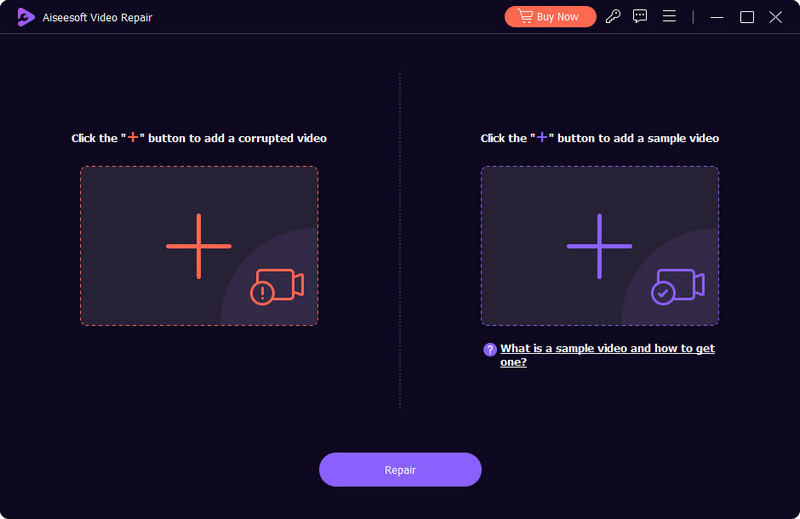
- After installing the software, launch the software on the PC and click on the red color “+” icon to fix the corrupted video files.
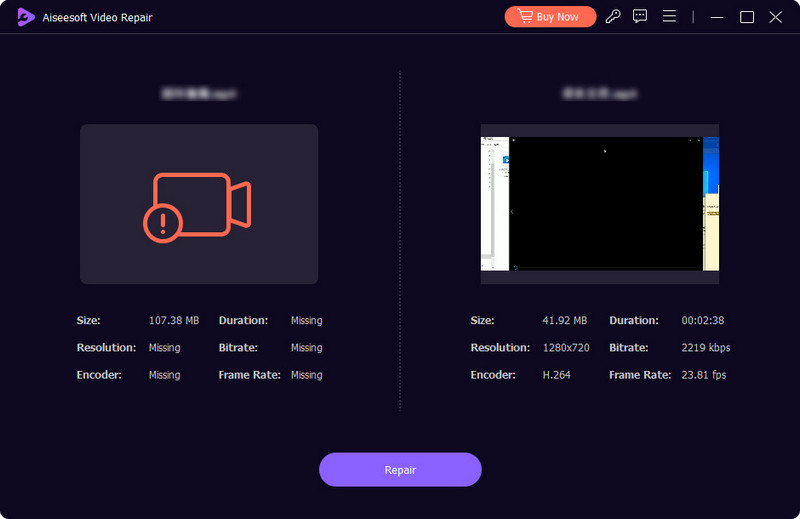
- Now, click the purple “+” icon to add the sample video for reference. Adding the reference or sample video is essential because it tells the software to add the required video dimensions, format, resolution, bitrate, encoder, etc.
- Suppose you don’t have a sample video to use as a reference. Shoot the video from the same device as the corrupted video. For example, if the corrupted video is from the mobile camera, shoot another video on your smartphone to use as a sample video.
- If you’ve downloaded the video from somewhere or someone has sent it to you, ask for the video, then ask the sender about its resolution, encoder, bitrate, frame rate, and format.
- Next, download another video from the internet having the same format and other settings.
- Now, use the video as a reference and click the “Repair” button to successfully repair the damaged or corrupted video files using this software.
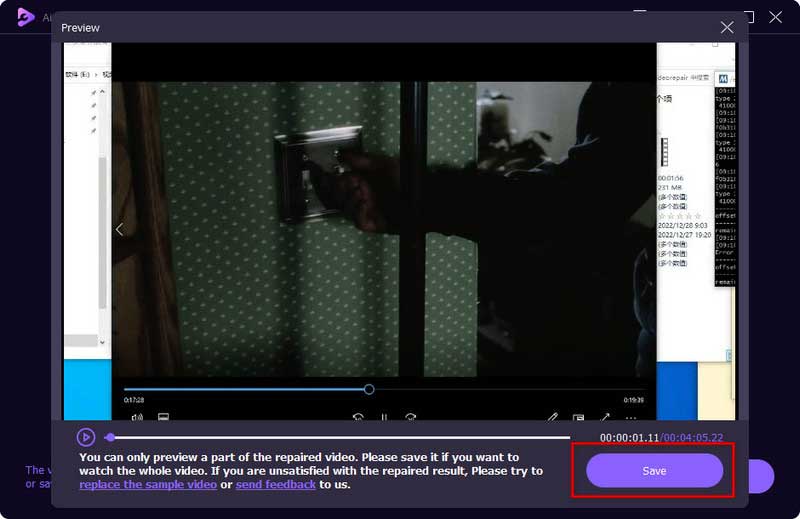
- Next, let the repair complete and wait until the video is completely repaired. Once you get the repaired video, preview it. Once satisfied with the result, click the “Save” button to save the repaired video on your PC by providing the safe PC directory or location.
Note:
If you cannot repair the video completely using this software, you must use the wrong format sample video to fix it. Using another sample video as a reference is advisable to repair the damaged video successfully.
To unlock all the features of the iBekit AI Universal Video Repair program, register with your email ID and then input your registered email ID and registration code.
Method 2: Fix the Corrupted Videos Via VLC Media Player
The VLC media player is a classic and advanced media player supporting almost every format. Most importantly, it allows you to control various audio and video conversions and repair options.
To fix the corrupted video on your PC, you must have the latest VLC media player on your system. Download and install the VLC media player on your system if you have not installed it.
Here’s how to fix the corrupted video file using the VLC media player. Follow these steps accurately to do it.
- Right-click the corrupted video file first, click the “Rename” and then rename this file ending with .avi.
- Now, open the video file in the VLC media player, click on the “Tools” tab from the header at the top, and then click the “Preferences” option from the drop-down list.
- Next, click the “Inupt/Codects” tab from the “Damaged or incomplete AVI file” section, click the drop-down list, and then select “Always fix” to fix the video file.
- Finally, click the “Save” button at the bottom of the window and relaunch the video file in the VLC media player to play the video.
Method 3: Repair Corrupted Video File Via Tweaking the Video Privacy
Most often, when you transfer the video, it may get corrupted and not play on your system due to accessibility permissions.
To fix the corrupted video file version using your Microsoft native Windows media player, follow these essential steps.
- Right-click on the corrupted video file and then click the “Properties” option from the list.
- Now, click the “Security” tab from the top and the “Advacne” button.
- Next, click the “Change” option from the “Owner” video authority section.
- Finally, write “everyone” in the “Enter the object name to select (example):” section.
- Now click the “OK” button to apply the changes and close recently opened windows. Then click “Apply,” “OK,” “OK,” “Apply,” and then “OK,” close all the windows and save the changes.
Once you’re done with all the above steps, follow the next steps to complete this process further.
- Again, follow the same, go to the same corrupted video file “Properties, “Security” tab, and then click on the “Advance” button as followed previously.
- Now, click the “Add” button below the “Permission entries” section and then click the “Select a principal” option.
- Now, write the same as “everyone” you did previously in the same “Enter the object name to select (example):” section. Then click the “OK” button to close this tab.
Next, select all options from the “Basic permissions:” section, including Full control, Modify, Read & execute, Read, and Write in the “Permission Entry for (followed by video file name)” window. Then click the “OK” button to save the permission-related changes.
- Finally, click the “Apply” button, click the “OK” button, click the “Apply” and then “OK” again to save the changes in the video file.
- Now, play the corrupted video file; hopefully, these methods will fix it.
Conclusion
In this blog post, I’ve explained the reasons for the video file's corruption in this article. I’ve also explained different methods you can follow to fix these issues.
Hopefully, with this guide, you’ve fixed the issues following one of these methods. If you’re still struggling to fix the video-playing problem, contact the iBekit technical team.